Search this blog

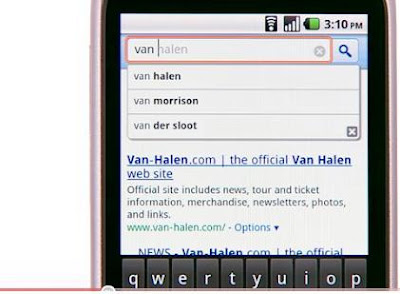
Google introduces Instant now on iPhone, and Android


Google Instant has now become available on mobile phones currently on iphone and android.

Now Google searchers using the iPhone and/or Android phones will start seeing Google Instant show up on their devices by now.According to Google it's a beta release, meaning Google doesn't want you to get mad at them if it doesn't work exactly right, and unlike the desktop version, you have to turn it on in order to see results as you type. It only works at Google.com in your mobile browser, but not in any of the other search boxes.

This is theoretically a good step to mobile searches, because typing on a mobile device is far more annoying than typing on a full-size keyboard as mobile's keypad size is small.  The keypad on several touch-screen mobile phones takes up nearly half the screen on its own, and the drop-down box that produces suggested Google Instant results further reduces the page available for the search results page itself.You'll need to be running iOS 4.0 or Android 2.2 in order for this to work, Google said.
 
READ MORE » Google introduces Instant now on iPhone, and Android

8pen app for Android 2.2 makes typing faster and easier

 
Keyboard is widely used device to input the data to some device as it is simplest and the fastest device , but with small screens on smartphones, using the on screen keyboard can be difficult. Thanks to the new app called 8pen, typing should become faster and easier than before.
 
8pen is an Android OS application that replaced the standard on screen keyboard, and instead of a QWERTY, there is one dot  that responds to the user’s finger movement. It’s quite simple, since all the letters are divided into four sectors and all that you have to do is to place your finger on the middle of the screen, move your finger into a certain sector and rotate your finger around the black dot in order to toggle between available letters inside that sector. This app works great and taking good market share , and has surely made typing a lot faster and easier  with a lot less errors.

READ MORE » 8pen app for Android 2.2 makes typing faster and easier

How to send an SMS to Android Emulator

Sending SMS is an useful feature of  the mobile devices, so if you want to send an SMS message to an android emulator running on your machine, then follow these steps:

1. In DDMS, choose the emulator you want a send an SMS to.
2. On the Emulator Control tab, input the Incoming phone number (for example,7856762) in the Telephony Actions section.
3. Select the SMS radio button.
4. Type an SMS message.
5. Click the Send button. In the emulator, you should see an incoming SMS notification.

Your emulator might look like this
READ MORE » How to send an SMS to Android Emulator

Launching Android Applications on a real Handset

Now to load your application onto a real handset, you need to plug in a handset into your computer, using the USB data cable.


Now follow the given below steps to ensure that you are going in right direction,

1. In Eclipse, choose Run, Debug Configurations.
2. Double-click "projectname" Debug Configuration.
3. On the Target tab, set Deployment Target Selection Mode to Manual. You can always change it back to Automatic later, but choosing Manual will force you to choose whether to debug within the emulator (and choose an AVD) or a device, if one is plugged in, whenever you choose to debug.
4. Apply your changes by clicking the Apply button.
5. Click the Debug button within Eclipse.

A  dialog appears,that is showing all available configurations for running and debugging your application. All physical devices are listed, as are existing emulators that are running.

6.Now Double-click one of the running Android devices. There should be one listed for each handset plugged into the machine, in addition to one for each emulator instance running. If you do not see the handset listed, check your cables and make sure you installed the appropriate drivers.
READ MORE » Launching Android Applications on a real Handset

Creating Debug and Run Configurations for Android Application in Eclipse


Firstly one thing I want to mention is that you are almost ready to launch your application. You just have one last task remaining .You need to create a Debug configuration (or a Run configuration) for your project.
To do this,follow the given below steps:

1. In Eclipse, choose Run, Debug Configurations.
2. Double-click the Android Application item to create a new entry.
3. Choose that new entry, called New_configuration
4. Change the name of the entry to DroidDebug.
5. Choose the Droid1 project by clicking the Browse button.
6. On the Target tab, check the box next to the AVD you created
7. Apply your changes by clicking the Apply button.

After applying all the above steps you will have a picture like this


READ MORE » Creating Debug and Run Configurations for Android Application in Eclipse

How to manage Android Virtual Devices

To run an application in the Android emulator, you must configure an Android Virtual Device (AVD). The AVD profile describes the type of device you want the emulator to simulate, including which Android platform to support. You can specify different screen sizes and orientations, and you can specify whether the emulator has an SD card and, if so, its capacity.

Given Below are the steps for creating a basic AVD:
1. Launch the Android SDK and AVD Manager from within Eclipse by clicking  on the little green Android icon on the toolbar. You can also launch the manager by selecting Window, Android SDK and AVD Manager in Eclipse.
2. Click the Virtual Devices menu item on the left menu. The configured AVDs  will be displayed as a list.
3. Click the New button to create a new AVD.
4. Choose a name for the AVD
5. Choose a build target. For example, to support Android 2.1, choose the item build target called Android 2.1 – API Level 7 from the drop-down.
6. Choose an SD card capacity, in either kibibytes or mibibytes
 (The minimum is 9MiB, but keep in mind that the
full size of the SD card is stored on your machine.)
7. Choose a skin. This option controls the different visual looks of the emulator.
In this case, go with the default HVGA screen, which will display in portrait
mode.
Your project settings should look as shown in Figure below.
8. Click the Create AVD button and wait for the operation to complete.
9. Click Finish.

Now you are done with the managing android virtual devices
READ MORE » How to manage Android Virtual Devices

Running and Debugging Android Applications

To build and debug an Android application, you must first configure your project for debugging. The ADT plug-in enables you to do this entirely within the Eclipse development environment. Specifically, you need to do the following three tasks:

  1.  Configure an Android Virtual Device (AVD) for the emulator
  2.  Create a debug configuration for your project
  3.  Build the Android project and launch the debug configuration

When you have completed each of these tasks, Eclipse will attach its debugger to the Android emulator (or handset), and you are free to debug the application as needed.
READ MORE » Running and Debugging Android Applications